Linework for Aircraft Profiles
Ah, creating linework ... this is where the journey starts, and I don't know that it ever stops. The more I draw, the more I learn and the more I realise I don't know. This may not be the best place to start, but it is definitely a place to start. I feel quite pretentious trying to teach people how to do what I can't really do all that well myself, but I know a step-by-step introduction like this certainly would have helped me and cut a couple of years off my own journey. So here goes, and my apologies for the presumption.
The Programs
I am going to assume you can already find your way around a vector art program, like Illustrator or Coreldraw, and a raster-based painting program like Photoshop or Painter. If you don't know these programs, or something similar, you might find it a bit hard to understand what on Earth I am talking about. I'm afraid I can't teach you those programs here. There are plenty of top-notch resources on the web where you can find out as much about them as you care to learn. I'm going to focus here on I how I use them to get the results I do.
References
Once you have decided on your subject, the next thing to do is collect your references. If you are doing this as a bit of fun, or just as an excersize in drawing, find a pretty good side shot of your favorite plane and start with that. If you are a painful rivet-counting tech-head obssessive geek like me, you'll want to find a second pic as well. Just to be sure. Or several hundred. I am of the persuasion that you just can't have enough reference. It seems that every single photo I find has something to tell me about the subject. I end up with folders within folders within folders of categorised and subcategorised images, filed by make, model, construction number and serial or registration. I'm serious. Most of them have been pinched off the web, but a lot I have taken myself. I just lurve my digi camera. And the Web.
Back to the story. You have chosen your subject and you have your photo. You now need to trace over the top of this to get your outlines and panel lines and wings and stuff.
I'm off again... I need to point something out here. If you are going for a reasonably accurate profile drawing, you need to pic your reference image very carefully. There can be some pretty major distortions in what appears to be a nice side-on shot. Be carefull! The best, least distorted side shots are those taken from a long way off with a telephoto lens. There are a number of reasons for this, but basically the whole aircraft is more or less the same distance away from the lens. If the pic has been taken close to the plane, with a relatively wide-angle lens, the nose and tail may be several metres further away from the lens than the middle of the fuselage. This creates much distortion and foreshortening of the nose and tail. The same thing happens if the pic is taken looking at one end, rather than the middle. Much of my work is created by montaging several pics together so I have a good representation of each section of the plane. This has it's own problems, like making sure each pic is scaled exactly the same.
If a photo has been taken fairly close to an aircraft, like this,
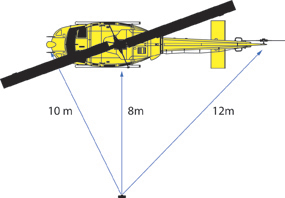
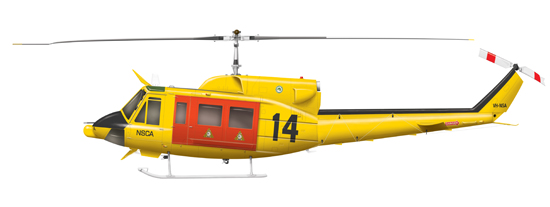
You get a result like this ...(This is exagerated with a distortion filter in Photoshop, but it illustrates the point well)...
A photo taken further away ...
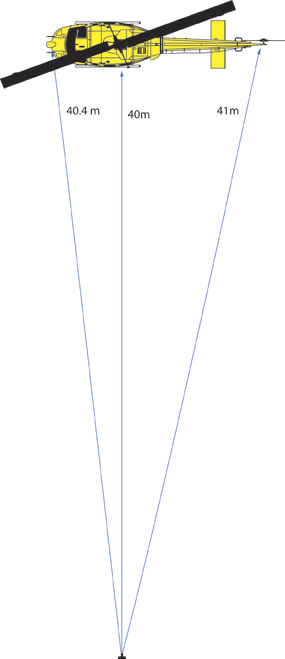
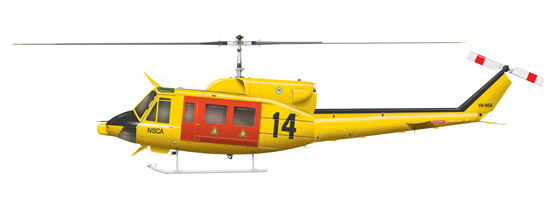
... introduces much less distortion and gives you a truer result ...
Creating the Linework
... I'm back again. So place your reference pic in the background of your vector-drawing file. I use Adobe Illustrator. Some guys do this all within Photoshop. It's a personal preference thing. So your reference image is placed in it's own layer. You can adjust the transparency of this layer so your reference pic is faded and your drawn linework stands out on top. If you leave the image at 100% transparency it can be hard to see your linework. Now you trace over the top of your reference pic. As I draw, I put different bits of the plane on different layers and in different layer groups so I can find any particular part or path quite easily. This also lets me separate different versions of the airframe for different aircraft. But then I am a painful rivet-counting tech-head obssessive geek. Keep going and tracing over all the bits until you have recreated the whole shebang in linework.

You are going to be using these paths in Photoshop as masks and to fill areas with paint and shading and stuff. Bear this in mind as you go. If the path you are drawing is going to contain a colour, say the rudder is a different colour to the tailfin, or there is a coloured band around the fuselage, it helps if you make it a separate closed path now. Then you don't have to keep coming back to create new paths. With lines of rivets, if you are putting them in at all, don't feel compelled to make a little circle for each rivet head (I'm not THAT bad!). Just put a line in where the rivets go. We can make it into dots when we paint it.
This is what it looks like with all the lines in place.

You are done when YOU are happy with it.
Onward to Step 2: Adding Colour!
Go to Drawing Aircraft from Linework Page
